9 Easy Tips To Ensure The Air Conditioner Runs Smoothly

source: Sherri James/DIY Network
I try to use the “open the windows” method as much as I can during the spring and summer. We run the air conditioner a minimal amount, partly because of the effects on the environment, and partly because it’s so expensive. However, there are those sweltering days and nights when turning on the AC is simply inevitable. To ensure your central air conditioning system is running smoothly and safely this summer, make sure you follow these nine simple tips provided by DIY Network!
1. Turn Off The Unit

To thoroughly clean and maintain your air conditioning unit, start by turning it off. Not only do you want to turn the actual unit off (there should be an exterior switch located in the unit’s power box), but you’ll also want to switch the breaker box hooked up to the unit to “off.”
2. Remove Inside Debris

Now that the unit is off, use a screwdriver to remove the fan cage. Either using your hands or a handheld vacuum, remove any leaves and debris that has made its way inside the unit.
3. Clean The Fins

Remove the unit’s outer covers and use a shop vacuum to clean exterior dirt and grime. Then, use a garden hose to spray the fins from the inside out. You won’t want to use a pressure washer, as this can damage the fins.
4. Straighten The Fins

If you notice your unit has bent fins, use a butter knife or fin-straightening tool to gently straighten them. Bent fins can reduce airflow efficiency, so this is an important step.
5. Remove Additional Debris

You can now reattach the unit’s cage. Next, ensure you remove any leaves, dry grass, and yard debris from the base of the unit. When you stop using your air conditioning unit in the fall, you should cover the top with a piece of plywood to prevent leaves from falling inside the unit.
6. Ensure The Unit Is Level

If your unit isn’t on level ground, it can cause the compressor to stop working. Use a level to check, and add in some rot-resistant shims to balance the unit if necessary.
7. Clean The Evaporator Coil

Here are DIY Network‘s instructions for cleaning the evaporator coil:
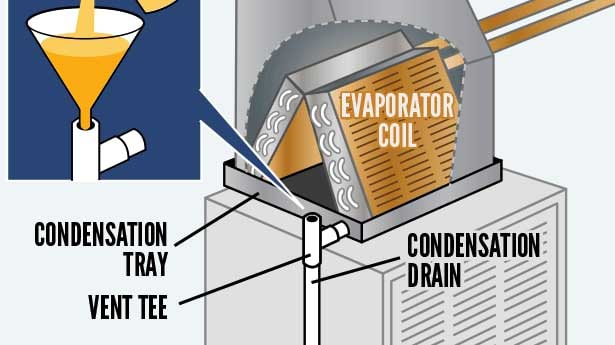
On the inside blower/furnace unit, find the evaporator coil door. You may need to remove some foil duct tape and take out a few screws or bolts. Inside, use a soft brush to dust off the coil, then spray the coil with commercially available no-rinse coil cleaner (available at home improvement stores). The spray will foam up and then drip into the drain pan. Clean out the drain pan with soap, hot water, and a little bleach. Then, pour a cup of 50% bleach/50% water down the drain. To keep the drain clear longer-term, place a commercially available drain pan tablet in the pan. This will inhibit future algae growth. If the bleach solution drains easily, skip the next step. If not, move on to next step. Replace the evaporator coil door and use foil duct tape to re-seal, if necessary.
8. Clean A Clogged Evaporator Drain

Over time, algae and mold can build up and potentially clog the evaporator drain. This can cause severe damage to the unit, and even make it quit altogether. Here’s what DIY Network suggests doing to clean the evaporator drain:
First, find the drain line where it leaves the evaporator coil enclosure. The drain is usually a one-inch PVC pipe (white, grey, or black). Follow it to the end where it drains. Often the line drains outside near the condenser unit, but it can also drain into a utility sink or basement floor drain or, in the case of attic units, down an outside wall. Once located, use a wet/dry vacuum to clear the drain. It’s best to remove the paper filter from the wet/dry vacuum so as not to ruin the filter. Hold the hose of the wet/dry vacuum to the end of the drain line. You can use duct tape or simply hold a rag around the gap. Turn on the vacuum for 2-3 minutes then turn off. This will clear the drain of any growing biological matter.
9. Change The Filter

And last but certainly not least, the filter in your HVAC system should be checked and changed at least twice per year. “Locate the filter enclosure on the indoor furnace/AC where the large fresh air return duct enters the unit,” advises DIY Network. “You may need a screwdriver to turn the latch to open the door to the filter enclosure. Remove the old filter and install the new filter, matching the air-flow direction arrows on the filter to the arrows on the unit. Close and latch the door.”
And that’s that! Now you’re ready to turn the air conditioning system back on and enjoy a cool house all summer long. Remember, there are certain jobs that should always be left for an HVAC technician. If there’s an issue beyond your scope of experience or knowledge, it’s well worth the money to call in for the services of a professional.